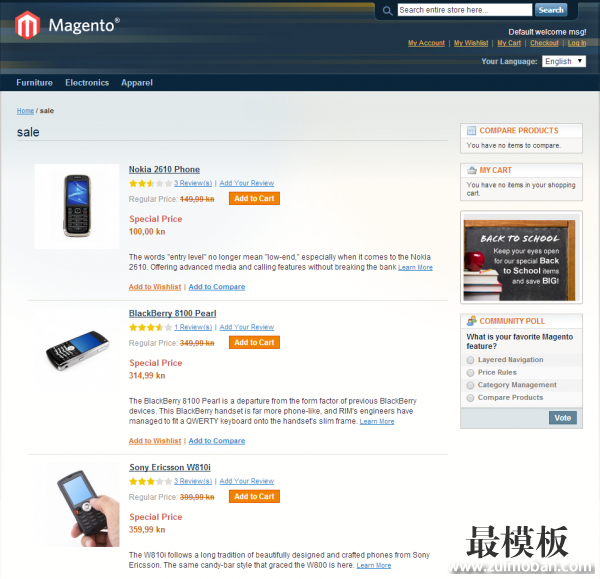
有些Magento客户想要在首页显示特卖产品,或者有时想要在某个分类中筛选特卖产品。在这篇magento教程中,我将写到两种列出特卖产品的方法:
让我们开始吧! 静态CMS页面使用后台管理员上传一个.phtml文件是一个将特卖产品显示在某个页面的快速方法。用这个方法你将不能使用分页和导航。如果你喜欢这些功 能,我推荐这篇文章的第二部分。 用以下内容创建一个新的CMS page
{{block type="catalog/product_list" template="inchoo/onsale/sale.phtml"}}
还有一个排列你产品的模版 app/design/frontend/default/YOUR_THEME/template/alwayly/onsale/sale.phtml
<?php
    $_productCollection = Mage::getModel('catalog/product')->getCollection();
    $_productCollection->addAttributeToSelect(array(
                                   'image',
                                   'name',
                                   'short_description'
                                              ))
                        ->addFieldToFilter('visibility', array(
                                    Mage_Catalog_Model_Product_Visibility::VISIBILITY_BOTH,
                                    Mage_Catalog_Model_Product_Visibility::VISIBILITY_IN_CATALOG
                            )) //showing just products visible in catalog or both search and catalog
                        ->addFinalPrice()
//                        ->addAttributeToSort('price', 'asc') //in case we would like to sort products by price
                        ->getSelect()
                        ->where('price_index.final_price < price_index.price')
//                        ->limit(30) //we specify how many products we want to show on this page
//                        ->order(new Zend_Db_Expr('RAND()')) //in case we would like to sort products randomly
                        ;

    Mage::getModel('review/review')->appendSummary($_productCollection);
    $_helper = $this->helper('catalog/output');
?>

<?php if(!$_productCollection->count()): ?>
    <p class="note-msg"><?php echo $this->__('There are no products matching the selection.') ?></p>
<?php else: ?>
    <div class="category-products">
        <?php // Grid Mode ?>
        <?php $_collectionSize = $_productCollection->count() ?>
        <?php $_columnCount = $this->getColumnCount(); ?>
        <?php $i=0; foreach ($_productCollection as $_product): ?>
        <?php if ($i++%$_columnCount==0): ?>
            <ul class="products-grid" style="padding:0; list-style: none">
        <?php endif ?>
            <li class="item<?php if(($i-1)%$_columnCount==0): ?> first<?php elseif($i%$_columnCount==0): ?>

last<?php endif; ?>">
                <a href="<?php echo $_product->getProductUrl() ?>" title="<?php echo $this->stripTags($this-

>getImageLabel($_product, 'small_image'), null, true) ?>" class="product-image"><img src="<?php echo $_product-

>getImageUrl(); ?>" width="135" height="135" alt="<?php echo $this->stripTags($this->getImageLabel($_product,

'small_image'), null, true) ?>" /></a>
                <h2 class="product-name"><a href="<?php echo $_product->getProductUrl() ?>" title="<?php

echo $this->stripTags($_product->getName(), null, true) ?>"><?php echo $_helper->productAttribute($_product,

$_product->getName(), 'name') ?></a></h2>
                <?php if($_product->getRatingSummary()): ?>
                    <?php echo $this->getReviewsSummaryHtml($_product, 'short') ?>
                <?php endif; ?>
                <?php echo $this->getPriceHtml($_product, true) ?>
                <div class="actions">
                    <?php if($_product->isSaleable()): ?>
                        <button type="button" title="<?php echo $this->__('Add to Cart') ?>" class="button btn-

cart" onclick="setLocation('<?php echo $this->getAddToCartUrl($_product) ?>')"><span><span><?php

echo $this->__('Add to Cart') ?></span></span></button>
                    <?php else: ?>
                        <p class="availability out-of-stock"><span><?php echo $this->__('Out of stock') ?

></span></p>
                    <?php endif; ?>
                    <ul class="add-to-links">
                        <?php if ($this->helper('wishlist')->isAllow()) : ?>
                            <li><a href="<?php echo $this->helper('wishlist')->getAddUrl($_product) ?>"

class="link-wishlist"><?php echo $this->__('Add to Wishlist') ?></a></li>
                        <?php endif; ?>
                        <?php if($_compareUrl=$this->getAddToCompareUrl($_product)): ?>
                            <li><span class="separator">|</span> <a href="<?php echo $_compareUrl ?

>" class="link-compare"><?php echo $this->__('Add to Compare') ?></a></li>
                        <?php endif; ?>
                    </ul>
                </div>
            </li>
            <?php if ($i%$_columnCount==0 || $i==$_collectionSize): ?>
            </ul>
        <?php endif ?>
        <?php endforeach ?>
        <script type="text/javascript">decorateGeneric($$('ul.products-grid'),

['odd','even','first','last'])</script>
    </div>
<?php endif; ?>
完成!尝试一下,然后访问你的CMS页面。你将看到带有特价的产品以列表的形式显示出来,就像这样:
修改一下以后,你也可以以网格的形式展示产品。 产品列表中的筛选器一个集合在被读入模版前,Magento会使用筛选器并读取到分层导航。这就是我们要重写 _getProductCollection方法的原 因,这样我们就能在集合被读取前使用自定义的筛选器。让我们扩展Mage_Catalog_Product_List类和渲染我们的块来替换分 类列表中默认的筛选器。 让我们注册这个模型。根据作用,我们给它命名"Alwayly/Onsale" app/etc/modules/Alwayly_Onsale.xml
<?xml version="1.0"?>
<config>
    <modules>
        <Alwayly_Onsale>
            <active>true</active>
            <codePool>local</codePool>
        </Alwayly_Onsale>
    </modules>
</config>
接着配置我们的模型。我们将用到块(block),助手(helper)并对我们模版的布局进行一点修改。 app/code/local/Inchoo/Onsale/etc/config.xml
<?xml version="1.0"?>
<config>
    <modules>
        <Alwayly_Onsale>
            <version>1.0.0.3</version>
        </Alwayly_Onsale>
    </modules>
    <global>
        <blocks>
            <alwayly_onsale>
                <class>Alwayly_Onsale_Block</class>
            </alwayly_onsale>
        </blocks>
        <helpers>
            <alwayly_onsale>
                <class>Alwayly_Onsale_Helper</class>
            </alwayly_onsale>
        </helpers>
    </global>
    <frontend>
        <layout>
            <updates>
                <onsale>
                    <file>alwayly/onsale.xml</file>
                </onsale>
            </updates>
        </layout>
    </frontend>
</config>
现在,注册一个包含getOnSaleUrl和getNotOnSaleUrl方法的助手。这两个方法将被用来获取我们复选框 中链接的地址。我们将添加一个新的变量-"Sale"到网址。当sale等于1的时候,我们将显示特卖的产品,如果没有被设置就会显示这个类中的所 有产品。 app/code/local/Inchoo/Onsale/Helper/Data.php
<?php
class Alwayly_Onsale_Helper_Data extends Mage_Core_Helper_Abstract
{
    public function getOnSaleUrl()
    {
        $url = Mage::getUrl('', array(
            '_current' => true,
            '_use_rewrite' => true,
            '_query' => array(
                'sale' => 1,
                'p' => NULL
            )
        ));

        return $url;
    }

    public function getNotOnSaleUrl()
    {
        $url = Mage::getUrl('', array(
            '_current' => true,
            '_use_rewrite' => true,
            '_query' => array(
                'sale' => NULL,
                'p' => NULL
            )
        ));

        return $url;
    }
}
接着让我们创建我们的块。我们将从Mage_Catalog_Block_Product_List扩展我们的类并添加 _getProductCollection方法。 app/code/local/Alwayly/Onsale/Block/Catalog/Product/List.php
<?php
class Alwayly_Onsale_Block_Catalog_Product_List extends Mage_Catalog_Block_Product_List
{
    protected function _getProductCollection()
    {
        if (is_null($this->_productCollection)) {
            $layer = $this->getLayer();
            /* @var $layer Mage_Catalog_Model_Layer */
            if ($this->getShowRootCategory()) {
                $this->setCategoryId(Mage::app()->getStore()->getRootCategoryId());
            }

            // if this is a product view page
            if (Mage::registry('product')) {
                // get collection of categories this product is associated with
                $categories = Mage::registry('product')->getCategoryCollection()
                                  ->setPage(1, 1)
                                  ->load();
                // if the product is associated with any category
                if ($categories->count()) {
                    // show products from this category
                    $this->setCategoryId(current($categories->getIterator()));
                }
            }

            $origCategory = null;
            if ($this->getCategoryId()) {
                $category = Mage::getModel('catalog/category')->load($this->getCategoryId());
                if ($category->getId()) {
                    $origCategory = $layer->getCurrentCategory();
                    $layer->setCurrentCategory($category);
                    $this->addModelTags($category);
                }
            }
            $this->_productCollection = $layer->getProductCollection();

//                inchoo start
            $param = Mage::app()->getRequest()->getParam('sale');
            if(isset($param) && $param==='1'){
                $this->_productCollection
                    ->addFinalPrice()
                    ->getSelect()
                    ->where('price_index.final_price < price_index.price');
            }
//                inchoo end

            $this->prepareSortableFieldsByCategory($layer->getCurrentCategory());

            if ($origCategory) {
                $layer->setCurrentCategory($origCategory);
            }
        }

        return $this->_productCollection;
//            return parent::_getProductCollection();
    }
}
我们还要在工具栏中添加一个复选框来让顾客筛选特卖产品。打开我们的toolbar.phtml文件。 app/design/frontend/default/YOUR_THEME/template/alwayly/onsale/toolbar.phtml
<!--alwayly start-->
<?php $helper = Mage::helper('alwayly_onsale'); ?>
<!--alwayly end-->
<?php if($this->getCollection()->getSize()): ?>
    <div class="toolbar">
        <div class="pager">
            <p class="amount">
                <?php if($this->getLastPageNum()>1): ?>
                    <?php echo $this->__('Items %s to %s of %s total', $this->getFirstNum(), $this->getLastNum(),

$this->getTotalNum()) ?>
                <?php else: ?>
                    <?php echo $this->__('%s Item(s)', $this->getTotalNum()) ?></strong>
                <?php endif; ?>
            </p>

            <div class="limiter">
                <label><?php echo $this->__('Show') ?></label>
                <select onchange="setLocation(this.value)">
                    <?php foreach ($this->getAvailableLimit() as  $_key=>$_limit): ?>
                        <option value="<?php echo $this->getLimitUrl($_key) ?>"<?php if($this->isLimitCurrent

($_key)): ?> selected="selected"<?php endif ?>>
                            <?php echo $_limit ?>
                        </option>
                    <?php endforeach; ?>
                </select><?php echo $this->__('per page') ?>
            </div>

            <?php echo $this->getPagerHtml() ?>

       </div>

        <?php if( $this->isExpanded() ): ?>
            <div class="sorter">
                <?php if( $this->isEnabledViewSwitcher() ): ?>
                    <p class="view-mode">
                        <?php $_modes = $this->getModes(); ?>
                        <?php if($_modes && count($_modes)>1): ?>
                            <label><?php echo $this->__('View as') ?>:</label>
                            <?php foreach ($this->getModes() as $_code=>$_label): ?>
                                <?php if($this->isModeActive($_code)): ?>
                                    <strong title="<?php echo $_label ?>" class="<?php echo strtolower($_code); ?

>">
                                    <?php echo $_label ?></strong>
                                    <?php else: ?>
                                    <a href="<?php echo $this->getModeUrl($_code) ?>" title="<?php echo $_label

?>" class="<?php echo strtolower($_code); ?>"><?php echo $_label ?>
                                <?php endif; ?>
                            <?php endforeach; ?>
                        <?php endif; ?>
                    </p>
                <?php endif; ?>

                <div class="sort-by">
                    <label><?php echo $this->__('Sort By') ?></label>
                   <select onchange="setLocation(this.value)">
                        <?php foreach($this->getAvailableOrders() as $_key=>$_order): ?>
                            <option value="<?php echo $this->getOrderUrl($_key, 'asc') ?>"<?php if($this-

>isOrderCurrent($_key)): ?> selected="selected"<?php endif; ?>>
                                <?php echo $this->__($_order) ?>
                            </option>
                        <?php endforeach; ?>
                    </select>
                    <?php if($this->getCurrentDirection() == 'desc'): ?>
                        <a href="<?php echo $this->getOrderUrl(null, 'asc') ?>" title="<?php echo $this->__

('Set Ascending Direction') ?>"><img src="<?php echo $this->getSkinUrl('images/i_desc_arrow.gif') ?>"

alt="<?php echo $this->__('Set Ascending Direction') ?>" class="v-middle" /></a>
                    <?php else: ?>
                        <a href="<?php echo $this->getOrderUrl(null, 'desc') ?>" title="<?php echo $this->__

('Set Descending Direction') ?>"><img src="<?php echo $this->getSkinUrl('images/i_asc_arrow.gif') ?>"

alt="<?php echo $this->__('Set Descending Direction') ?>" class="v-middle" /></a>

                <!--alwayly start-->
                        <label for="sale"><?php echo $this->__('On Sale') ?></label>
                        <input name="sale" id="sale" type="checkbox"
                            value="<?php
                                $currentUrl = Mage::helper('core/url')->getCurrentUrl();
                                if($currentUrl===$helper->getOnSaleUrl()):
                                    echo $helper->getNotOnSaleUrl();
                                    echo "\"checked=\"checked";
                                else:
                                    echo $helper->getOnSaleUrl();
                                endif;
                            ?>" autocomplete="off" onchange="setLocation(this.value)"/>
                <!--alwayly end-->
                    <?php endif; ?>
                </div>
            </div>
        <?php endif; ?>
    </div>
<?php endif ?>
</strong>
最后,创建我们的布局文件来让Magento来使用我们的toolbar.phtml。 app/design/frontend/default/YOUR_THEME/layout/alwayly/onsale.xml
<?xml version="1.0"?>

<layout version="0.1.0">
    <catalog_category_default>
        <reference name="category.products">
                <block type="inchoo_onsale/catalog_product_list" name="product_list" template="catalog/product/list.phtml">
                    <block type="catalog/product_list_toolbar" name="product_list_toolbar" template="inchoo/onsale/toolbar.phtml">
                        <block type="page/html_pager" name="product_list_toolbar_pager"/>

                        <!-- The following code shows how to set your own pager increments -->
                        <!--
                            <action method="setDefaultListPerPage"><limit>4</limit></action>
                            <action method="setDefaultGridPerPage"><limit>9</limit></action>
                            <action method="addPagerLimit"><mode>list</mode><limit>2</limit></action>
                            <action method="addPagerLimit"><mode>list</mode><limit>4</limit></action>
                            <action method="addPagerLimit"><mode>list</mode><limit>6</limit></action>
                            <action method="addPagerLimit"><mode>list</mode><limit>8</limit></action>
                            <action method="addPagerLimit" translate="label"><mode>list</mode><limit>all</limit><label>All</label></action>
                        -->
                    </block>
                    <action method="addColumnCountLayoutDepend"><layout>empty</layout><count>6</count></action>
                    <action method="addColumnCountLayoutDepend"><layout>one_column</layout><count>5</count></action>
                    <action method="addColumnCountLayoutDepend"><layout>two_columns_left</layout><count>4</count></action>
                    <action method="addColumnCountLayoutDepend"><layout>two_columns_right</layout><count>4</count></action>
                    <action method="addColumnCountLayoutDepend"><layout>three_columns</layout><count>3</count></action>
                    <action method="setToolbarBlockName"><name>product_list_toolbar</name></action>
                </block>
        </reference>
    </catalog_category_default>

    <catalog_category_layered>
        <reference name="category.products">
            <block type="inchoo_onsale/catalog_product_list" name="product_list" template="catalog/product/list.phtml">
                <block type="catalog/product_list_toolbar" name="product_list_toolbar" template="inchoo/onsale/toolbar.phtml">
                    <block type="page/html_pager" name="product_list_toolbar_pager"/>

                    <!-- The following code shows how to set your own pager increments -->
                    <!--
                        <action method="setDefaultListPerPage"><limit>4</limit></action>
                        <action method="setDefaultGridPerPage"><limit>9</limit></action>
                        <action method="addPagerLimit"><mode>list</mode><limit>2</limit></action>
                        <action method="addPagerLimit"><mode>list</mode><limit>4</limit></action>
                        <action method="addPagerLimit"><mode>list</mode><limit>6</limit></action>
                        <action method="addPagerLimit"><mode>list</mode><limit>8</limit></action>
                        <action method="addPagerLimit" translate="label"><mode>list</mode><limit>all</limit><label>All</label></action>
                    -->
                </block>
                <action method="addColumnCountLayoutDepend"><layout>empty</layout><count>6</count></action>
                <action method="addColumnCountLayoutDepend"><layout>one_column</layout><count>5</count></action>
                <action method="addColumnCountLayoutDepend"><layout>two_columns_left</layout><count>4</count></action>
                <action method="addColumnCountLayoutDepend"><layout>two_columns_right</layout><count>4</count></action>
                <action method="addColumnCountLayoutDepend"><layout>three_columns</layout><count>3</count></action>
                <action method="setToolbarBlockName"><name>product_list_toolbar</name></action>
            </block>
        </reference>
    </catalog_category_layered>
</layout>
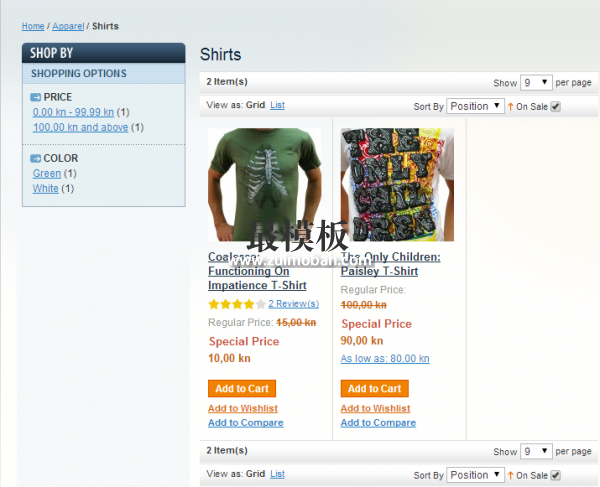
看看效果:
我们注意到分层导航和分页一样工作正常。如我们所期待的一样…… (责任编辑:最模板) |
Magento列出特卖产品的方法
时间:2017-01-13 00:03来源:未知 作者:最模板 点击:次
有些Magento客户想要在首页显示特卖产品,或者有时想要在某个分类中筛选特卖产品。在这篇magento教程中,我将写到两种列出特卖产品的方法: Magento首页作为列表显示; 在产品列表页
顶一下
(0)
0%
踩一下
(0)
0%
------分隔线----------------------------
- 热点内容
-
- magento catalog Model Product with the same
Item(Mage_Catalog_Model_Product)withthesameid934alreadyexist 追踪SQL发现是ca...
- 如何对Magento产品进行分目录的产品
Magento: 如何对产品进行分目录的产品搜索 In advanced search feature...
- Magento系统多域名设置要点
Magento支持多域多店设置,使用一个后台管理多个域方便了管理,...
- magento把reviews的链接换成产品的链接
Magento首面到产品list.phtml里面看看 有没有调用 ?php if($_product-ge...
- 解决Magento刷新索引错误
很多时候我们在添加完产品习惯性的会刷新索引(Reindex),但是一些...
- magento catalog Model Product with the same
- 随机模板
-
-
 ecshop英文外贸工业模板
人气:474
-
 ecshop内衣服装综合模板
人气:1237
-
 Super Duper高端女装商城Ma
人气:237
-
 一号店模板|ecshop综合模板
人气:514
-
 shopex仿m18麦考林模板
人气:411
-
 ecshop仿2011最新走秀网
人气:1700
-

