在opencart添加Buy on Amazon跳转购买按钮
在在opencart搭建独立站跳转到亚马逊购买按钮流程开始:
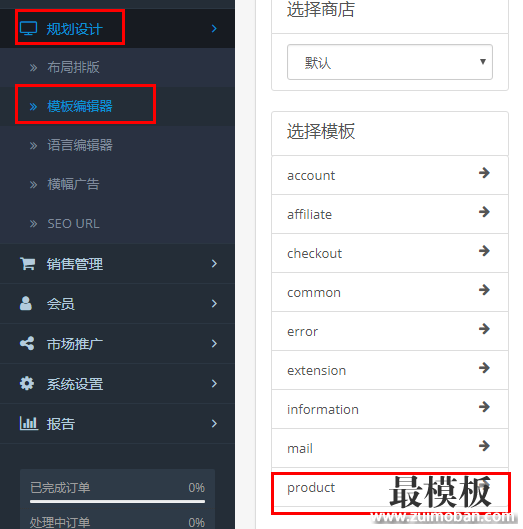
1.打开opencart后台–规划设计–模板编辑器–product
2.输入以下代码
<style type=”text/css”>
.buy_button_thr { position: absolute; width: 185px; height: 42px; line-height: 42px; display: inline-block; margin-left: 10px; font-size: 14px; }
.buy_button_thr a { text-align: center; cursor: pointer; color: #fff; display: block; text-decoration: none; }
.buy_button_thr .buy_button_thr_a { border-radius: 50px; background: #f7ab00; }
.buy_button_thr .buy_button_thr_a:hover { background-color: #7f7f7f; }
.buy_button_thr .buy_button_thr_ul { list-style: none; margin: 0; padding: 18px; background-color: #efefef; position: absolute;width:100%;z-index:1; }
.buy_button_thr .hide { display: none; }
.buy_button_thr .buy_button_thr_ul li { display: block; padding: 4px 6px; font-weight: 400; line-height: 20px; margin-bottom: 4px; }
.buy_button_thr .buy_button_thr_ul li a { font-size: 12px; text-align: left; cursor: pointer; color: #6d6d6d; display: block; line-height: 100%; }
.buy_button_thr .buy_button_thr_ul li:hover a { color: #ec4a00; }
.buy_button_thr .buy_button_thr_ul img { vertical-align: middle; max-width: 100%; }
.buy_button_thr .buy_button_thr_ul li em { margin-left: 4px; }
#tab-description { line-height: 18px; padding-top:0;}
#tab-description > p { margin-bottom: 0; }
</style>
{% if HIDDEN_LINKS %}
<div id=”HIDDEN_LINKS” style=”display:none;”>{{ HIDDEN_LINKS }}</div>
{% endif %}
<script type=”text/javascript”>
$(function () {
({
jsonSelector: ‘#HIDDEN_LINKS’,
insertAfterSecltor: ‘#button-cart’,
countryIcon: {
uk: {
title: ‘United Kingdom’,
src: ‘/image/catalog/countryImgs/i_uk.jpg’
},
de: {
title: ‘Germany’,
src: ‘/image/catalog/countryImgs/i_de.jpg’
},
us: {
title: ‘United States’,
src: ‘/image/catalog/countryImgs/i_us.jpg’
},
jp: {
title: ‘Japan’,
src: ‘/image/catalog/countryImgs/i_jp.jpg’
},
it: {
title: ‘Italy’,
src: ‘/image/catalog/countryImgs/i_it.jpg’
},
es: {
title: ‘Spain’,
src :’/image/catalog/countryImgs/i_sp.jpg’
},
fr: {
title: ‘France’,
src: ‘/image/catalog/countryImgs/i_fr.jpg’
},
ca: {
title: ‘Canada’,
src: ‘/image/catalog/countryImgs/i_ca.jpg’
}
},
getLinks: function () {
try{
var $el = $(this.jsonSelector),
jsonStr = “”;
if ($el.length > 0) {
jsonStr = $el[0].tagName == “INPUT” ? $el.val() : $el.html();
}
return jsonStr.length > 0 ? JSON.parse(jsonStr) : ”;
}catch(e){
return ”;
}
},
createHtml: function (array) {
var i, len = array.length,temp,liStr=”,iconCfg;
for (i = 0; i < len; i++) {
temp = array[i];
iconCfg = this.countryIcon[temp.img] || temp.img;
liStr += ‘<li>
<a target=”_blank” href=”‘+ temp.link + ‘”>
< img data-width="194">
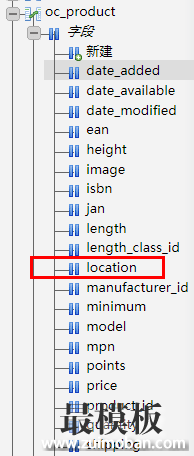
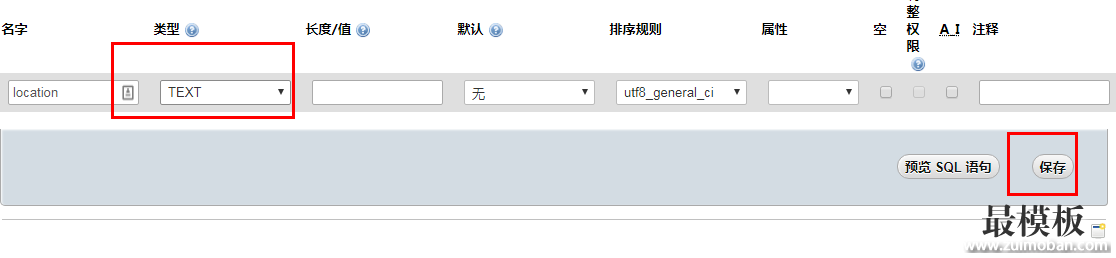
4.然后在每个产品的生产地写上以下代码
[{“img”:”jp”,”link”:”https://www.zuimoban.com”}]
其中jp,跟link部分是可以更改的,如果有多个站点,就复制上一条句型就可以了,效果如下:

总结以下:
1.添加代码到后台
2.修改服务器字段的属性
3.为每个产品添加各个站点的链接
完美跳转到亚马逊上!
相关文章
解决opencart升级后主题与扩展不显示、权
解决opencart升级后主题与扩展不显示、权限等问题, 1、后台导航菜单没有扩展功能(扩展不显示) 2、只要是报错显示DIR_XXXX 基本都是config.php和 admin/config.php 这两配置文件有关 我这问题...
2019-12-30在opencart添加Buy on Amazon跳转购买按钮
在在opencart搭建独立站跳转到亚马逊购买按钮流程开始: 1.打开opencart后台规划设计模板编辑器product 2.输入以下代码 style type=text/css .buy_button_thr { position: absolute; width: 185px; height: 42px; l...
2019-12-31将Opencart产品选项价格添加到购物车页面
怎么样才能将Opencart选项价格添加到cart.tpl ??? 在product.tpl中找到 ?php foreach ($product[option] as $option) { ? - small?php echo $option[name]; ?: ?php echo $option[value]; ?/smallbr / ?php } ? 有没有办法为这段代码...
2020-02-25解决opencart设置SSL后评论不能翻页
opencart网站添加了SSL加密实现https,并设置了301跳转使http跳到https,但是我们发现opencart评论分页无法加载分页,分析发现分页链接是http开头的,http://www.zuimoban.com/index.php?route=product/pr...
2019-10-23启用OpenCart网站地图Sitemap.xml并提交给谷
OpenCart 内建产生Sitemap.xml feed 的功能,但Sitemap 模块预设并没有安装启用,所以要提交Sitemap 之前,必须先安装启用Sitemap 模块。 Sitemap 模块位于后台 扩充模块管理 扩充模块管理 Feeds 模块...
2022-05-11设置OpenCart商品特价与大批量优惠折扣
OpenCart内置特价和大批量优惠,两个非常实用的商品折扣功能。当然,商家可以安装或自定义更多的折扣模块,但这两个内置的折扣功能要先熟悉一下。 特价功能,提供商家可以指定适...
2022-05-11