|

Dropdown login forms are not a feature many online stores use, but in some cases they could be quite useful UX feature. In this tutorial, I will explain how to create such a dropdown in a few minutes!
并不是每一个站都用下拉登陆菜单,但对某些时候确实非常实用。这次我们就来体验一下如何给Magento制作一个下拉登陆菜单。
Let’s open app/design/frontend/base/default/layout/customer.xml and just add the line that’s highlighted.
打开上述文件app/design/frontend/base/default/layout/customer.xml ,添加高两部分代码。
|
1
2
3
4
5
6
7
8
9
10
|
<customer_logged_out>
<!---<reference name="right">
<block type="customer/form_login" name="customer_form_mini_login" before="-" template="customer/form/mini.login.phtml"/>
</reference>-->
<reference name="top.links">
<action method="addLink" translate="label title" module="customer"><label>Log In</label><url helper="customer/getLoginUrl"/><title>Log In</title><prepare/><urlParams/><position>100</position></action>
<block type="core/template" name="customer_form_mini_login" before="-" template="customer/form/mini.login.phtml"/>
</reference>
<remove name="reorder"></remove>
</customer_logged_out>
|
Open app/design/frontend/base/default/template/customer/form/mini.login.phtml as well and place the code below instead.
打开 app/design/frontend/base/default/template/customer/form/mini.login.phtml ,用下面代码替代。
|
1
2
3
4
5
6
7
8
9
10
11
12
13
14
15
16
17
18
19
20
21
22
23
24
25
26
27
28
29
|
<style>
#dropdown
{
position: absolute;
top: 70px;
right: 20px;
visibility: hidden;
float:right;
}
.last:hover #dropdown
{
visibility: visible;
}
</style>
<div class="block block-login" id="dropdown">
<div class="block-title">
<strong><span><?php echo $this->__('Login') ?></span></strong>
</div>
<form action="<?php echo $this->getUrl('customer/account/loginPost') ?>" method="post">
<?php echo $this->getBlockHtml('formkey'); ?>
<div class="block-content">
<label for="mini-login"><?php echo $this->__('Email:') ?></label><input type="text" name="login[username]" id="mini-login" class="input-text" />
<label for="mini-password"><?php echo $this->__('Password:') ?></label><input type="password" name="login[password]"id="mini-password" class="input-text" />
<div class="actions">
<button type="submit" class="button"><span><span><?php echo $this->__('Login') ?></span></span></button>
</div>
</div>
</form>
</div>
|
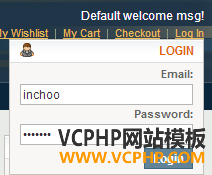
And that’s it! Your login form should appear when hovering over ‘Log In‘ link in the top menu:
Ok,现在去看看你的登录框吧,鼠标滑过Login,就出现了。

The important thing to note here is that we’re using Magento’s default mini.login.phtml with slight modifications for it to work on homepage.
We’re also using core/template block instead of customer/form_login. The reason for this is that the latter sets the page title to ‘Customer login‘ on all pages it’s being displayed on.
As a downside to using different block, we now can’t use methods of the customer/form_login block. That is why we’re using $this->getUrl(‘customer/account/loginPost’) as a form action instead of $this->getPostActionUrl().
It’s also important that you have a form key present, otherwise your form won’t get processed.
|
1
|
<?php echo $this->getBlockHtml('formkey'); ?>
|
And all that’s left is to have your frontend developer (you?) make the dropdown pretty
(责任编辑:最模板) |


